Showing posts with label decorating on a budget. Show all posts

Thursday, 20 October 2011

a little studio tour

 i have finally tidied up my tiny cupboard studio and took a few pics for you to see where i create my cards and invitations and of course write this blog and drool over other blogs and etsy sellers! 
above is my adjustable easel desk - it's from Ikea and is huge. it's ideal for working on as there is such a large area but the only downside is that it is a tad too big for my tiny workspace. behind my teeny tiny laptop are a couple of paintings my nan painted and gifted to me (along with many others) she is a fantastic painter. i love these because they remind me of her and really cheer me up and inspire me to keep on creating. i have two notebooks that i constantly use, one is for my all of my 'to-do's' and the other is for planning blog posts (which is kind of empty right now but wont be for much longer thanks to this). the old wooden box is a car boot find and contains my equipment such as my glue gun and paper-craft tools. i often take product pictures on here too for a more rustic effect. the Eiffel tower picture is actually a card from fellow etsy seller, Paula from Picard Creative, i received it as a thank you for ordering some of her hilarious magnets one Christmas for my girlfriends.
top left is my humble shelving unit - i think i got it from Argos and it was originally a yellow pine colour so i painted it white. i keep my card supplies, printer and mailing envelopes on here as well as my folders for various boring important bits and pieces. on the top is a white cushion i decorated with some old scarves and the rest of the scarves were used to make my makeshift blind. to the left of the cushion are some of the art dolls that i made with the help of my mum, she created all the hair and amazing clothes (they remind me of Downton Abbey) i had some children that we made and they went to a lovely home in Saudi Arabia in the end which is great. 
 my typewriter is my absolute favourite possession (a gift from my mum) and i use it all the time for adding text to my cards and and invitations quickly and easily. the ink still hasn't ran out and i have had this well over a year now. above the typewriter is my little washing line style photography area. the light here is best as it is right next to the window. i peg my cards up with the little pegs or a bull dog clip and snap away.
above left is a picture of my wonderful mum. i normally have her positioned so that she is looking at me and spurring me on to get things done. i am very lucky in the fact that she has always supported my creative endeavours and will often come round with a bag full of supplies for me to use in my projects. this picture was taken about 20 years ago when she was about a year or two older than i am now. isn't she beautiful?
i made the blind myself very quickly by sewing together two Laura Ashley scarves that i found in a charity shop (!) i then pinned it up above the window with some diamanté pins that i slotted into some holes that were already there (bonus). the fabric is so light that they hold it up really well. i then took a cut off from one of the scarves and pinned that to the left inside edge of the window so that i can tie the blind back as and when i need to. it took about and hour and half altogether.


well, that's it, my little tour is over - sorry it wasn't much but it really is a very small space. but it's my little haven really. here are some of my favourite studio tours from around the web.


+ fieldguided's tour
+ creature comforts Ez's workspace
+ industrial style
+ studio set up tips


Rx

Friday, 8 April 2011

rustic garden furniture ideas

i have been looking for some garden decorating ideas and came across some lovely images to give me some ideas too. can you believe i do not actually have any garden furniture? i mean, who hasn't got at least a table and chairs! my husband is from South Africa so he is constantly 'braai-ing' (the Afrikaans word for barbequeing)come rain or shine!which makes me even more ashamed that i havn't sorted out my garden furniture situation.
The thing that has held me back is that they are so expensive to buy new if you like the rustic/vintage/shabby chic look like me. i seriously need to go hunting for some cheap but stylish finds. i love the idea of some folding bistro style chairs (they can be packed away to keep dry when it rains) 
i would also like some lanterns in varying sizes - there's nothing quite like talking with your chums outside over candlelight (and some wine) on a late summers evening is there?
here are some ideas..
distressed painted furniture with pretty throws
rustic vintage benches piled with cushions
farmhouse style dining chairs and table

        IMAGE VIA PINKLE MONA DESIGN           IMAGE VIA CANDY HEARTS AND PAPERFLOWERS
           chest of drawers                     armchairs
here are some different and cheap garden furniture ideas -

  1. paint your current furniture a different colour. who says that all garden furniture must be brown?
  2. use dining furniture in the garden. if it is extra special you will need to keep it stored away when the weather is bad to stop it distressing - unless like me, you like that look of course.
  3. take your fancy chairs out into the garden for special occasions
  4. you can even incorporate chests of drawers and dressers into the garden - especially if you have a large patio area. or pergoda. you could paint them with outside/exterior paints to protect the woodwork
  5. bistro sets look stunning in different shades of paint - especially bottle green,dark red and yellow - even better if the paint is peeling off a bit!
  6. hammocks - who wouldn't love a hammock! i just don't have two trees to hang one from :(
  7. mismatched chairs are ideal for the vintage/rustic look garden AND for the bank balance as you can pick up old chairs for next to nothing (£5 or less) at your local car boot sale. anyway, mismatched chairs look better too.
  8.  vintage metal beds make unique outdoors day beds- see below                                                 IMAGE - LUNDAGARD VIA PINTEREST
add ambience to summer entertaining with these accessories-


  1. lighting - an absolute must for summer evening entertaining. you can create lighting with tealights in simple holders or jars. more elaborate tea light holders are also availiable that fix to outside walls. lanterns in differing shapes and sizes aswell as hurricane lamps help add ambience. fire pits are a great focal point. also, why not bring your fancy candelabras outside to the garden, these look excellent on a vintage style table - the more the better too. simple church candles also work really well clustered together.
  2. lots of plump cushions. i like either neutral such as natural fabrics and cream, white and brown tones. or blue and white stripe or grey tones. cushions look so chic piled onto a bench. throws in different colours and patterns are a great way to keep warm helping to extend the party into the night!
  3. vintage tea cups and cake stands
  4. mismatched cutlery
  5. vintage bottles such as pharmacy/apothecary bottles/lab/medicine bottles used like vases with single flower stems inside. wine bottles as candle holders. vintage milk bottles and soda bottles for storing your drinks.
  6. bunting. you can make your own bunting from fabric, postcards,vintage photos and even garden seed packets.
  7. flowers - either single stems in individual bottles or small vases or large displays in eleborate vases - either way - it has to be done! flowers also look beautiful in vintage enamel jugs and mugs.
  8. if you haven't got the table of your dreams or, it isn't the colour you would like you can always dress it with a tablecloth. i am actually considering doing this with our old dining table that is living in our outbuilding. i have seen some lovely vintage linen fabric on etsy that i could make into a table cloth.
  9. if you have any  bare exterior garden walls - why not paint them in the colour of your choice and decorate with hanging baskets or garden art.


                      IMAGE VIA COUNTRY LIVING

click here for an excellent guide from country living to organizing a summer garden party.

i hope this has given you a few ideas to enjoy your garden and maybe throw a party on two this summer - if you have any more tips for garden parties or cheap furniture ideas please share them!

R x

Tuesday, 29 March 2011

dining room makeover progress

 hi guys, as promised a little update on the dining room makeover since my last post. with the help of my sister (thanks again Kelly!) the walls are done and the dresser table top and fireplace surround. i chose farrow and ball's james white in eggshell for these. i know that farrow and ball paint is not normally the 'budget choice for paint' (i know what you are thinking 'this is a budget decorating blog?') but the reason i chose it was because it was only for the furniture and it does go a very long way. also it hardly drips and created a really professional finish. i only needed two coats and each coat dried in about 5 minutes which helped speed up the whole process. it cost £17 per small can (a litre per can - i think) so £34 in total and for the massively improved look of the dated early 90's furniture - it was money really well spent.

to paint the dresser we took off the hardware - ie. brass knobs and door hinges and took out all of the door glass and the glass shelving. in hindsight i wish i had left the doors on to paint them as they were very fiddly to paint while on the floor as i had to wait for each surface to dry before proceeding to the next part. i had to paint all on the inside of the top section of the dresser as it is all exposed due to the mirrors, lighting and see through doors and had to be careful with the paint. this was probably the fiddliest part of all. for the bottom all i did was paint the inside of the doors. i didn't bother painting the shelving inside as it won't be visible and i had to be sparing with the paint!
once dried i used some varnish/paint remover from b&q on a piece of cotton wool to remove the excess paint on the mirrors at the back.
then i replaced the knobs and shelves and attached the doors. our friends were so surprised when they saw the dresser - they couldn't believe that my Mum (who gave me all the dining room furniture) got it along with the matching extendable table and chairs at a charity furniture shop all for about £100!

you may be wondering why i didn't paint the chairs too. well, we did paint two chairs but my husband felt that it would maybe be a bit too much white so we opted for the contrasting look and kept four of the chairs in their original mahogany-esque style and the other two painted chairs can be for extras as and when required. also i decided not to paint the table legs for two reason, again for the contrast and also as i was running low on paint!

 there is still a lot to do but i decided to add just a couple of decorative features as we had friends to visit on the saturday following all of the painting so wanted it to look at least a little bit presentable. so i put my vintage sewing machine back in her corner and plonked the candelabra on her and thought it looked quite good so kept it there. then i just added a couple of spritzer bottles and a vintage shoe form (all found or given to me from charity shops/car boot) on the mantelpiece along with some glass tea light holders and a cute picture of my stepson.  

so, now for the next 'to do' list

  • remove the awful blue carpet
  • paint the skirting boards
  • fit the new carpet (i have sourced a natural coir carpet at around £12 a sq meter)
  • recover the upholstery on the dining room chairs
  • find or make some nice cushions for the chairs
  • get a nice rustic mirror for above the mantelpiece and lots of frames and pictures for the walls (this will definitely be a work in progress task)
  • fit the chandelier
  • work out what to do about disguising the clashing marble surround and gas fire - maybe i'll find a large fire screen to cover it - any ideas on this dilemma are greatly appreciated!
  • fit some nice curtains - colours not yet decided - again any ideas are most welcome
i think it will be another few months till its completed but i feel like i am getting there now. the next stage is to add some warmth and colour to the room by way of the carpet, fabrics and pictures. mainly the pictures as i can change those as and when the mood suits me. and the cushions i will be adding to the chairs (on top of the new upholstery) will be easy to change too, which is good as i am thinking of hot pinks, oranges and purples for my first set of cushions!

R x

Monday, 21 March 2011

hanging vases

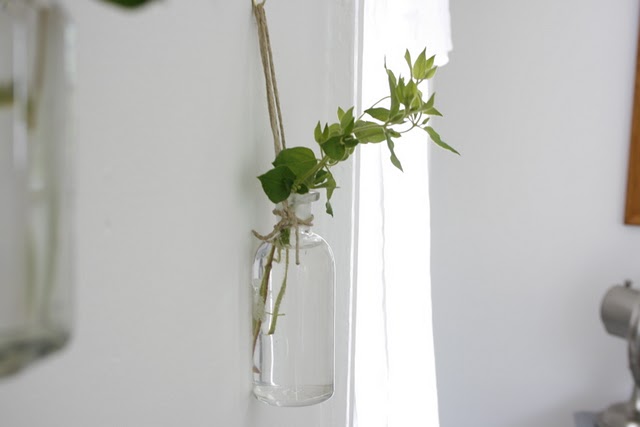
i saw these unique hanging vases found on analogue life  via hello, friend and thought they were so clever. i don't think i have seen flowers displayed in this way before. it's a great idea for me as i don't seem to have much display space ie. shelves but have loads of bare walls. this would be a really easy and clever way to brighten them up - and make everything feel even more spring like! here are some more ideas -

                                                                                                         PICTURE VIA GOINGHOMETOROOST

single hanging bottles look great as vases, simply tie with twine or string and hang from a secure nail. i love the simpleness of this style with the one single bloom

                                                                                                                    PICTURE VIA I ADORE STYLE

these test tube style vases are really cool and you can buy vases like these here and vintage test tubes look awesome too for displaying your flowers check out these.


                                                                                                 ABOVE PICTURES VIA GARDEN MAMA

for a super sweet hanging vase tutorial please check out this gardenmamas one here. and click here for a fab tutorial for creating a beautiful wedding themed hanging vase centrepiece from ruffled blog.

hope you have a lovely monday!

R x

Sunday, 6 March 2011

dining room make over


i thought i would post some pics of my dining room make-over progress so i can have a record of how bad the in-between stages are and then (hopefully) when it is finished some pics of how good it can look afterwards. this is so that i don't get totally depressed next time i have to decorate a room (which will be many times as the whole house needs redecorating!)

to be honest even though i am now on the 2nd day of painting and the 4th day of decorating in total i am starting to feel like i am getting somewhere. the first two days were spent stripping the wallpaper which had been painted over a couple of times so, wasn't particularly easy to remove. i am very grateful for the help my sister has given me with this too. i would still probably be stripping still if i didn't get her to help!

anyway, here is what i have left to do -

  1. some touch ups of paint on the walls
  2. get the carpet up
  3. clean and gloss the skirting boards
  4. paint the fireplace surround and re-attach
  5. undo and paint chairs
  6. re-upholster chairs
  7. paint table
  8. paint dresser
  9. re-carpet
  10. fit chandelier
  11. put up pictures and mirrors etc....
no.11 is the bit i can't wait for oh, and no.10 too. i feel better now i have written a list! i hope to have it all done by next weekend but - we'll see :)

R x

(by the way the table in the pic is being repainted - i would never normally treat a lovely piece of furniture so cruelly!)

Monday, 28 February 2011

sunday treasure hunt

this weekend myself and my husband went to a local car boot. i wanted to find some frames to hang some pictures etc for a feature wall in my living room.and also some more vintage items for the shoppe

along with some bargain frames - i also came across this lovely handmade flower pressing - it's so sweet - i don't think i want to part with it! some other unique 'treasures' i found was some amazing stamp collecting ephemera -

i am thinking that i will keep these too for my feature wall. there are six in total and i got them for a bargain price of £3. i'm not exactly sure what these letters are - they look like they were sent out to stamp collectors to alert them of the new stamps available. look at Prince Charles on the right - doesn't he look young!

R x

ALL PICTURES -  MY OWN

Thursday, 24 February 2011

feature walls & some of my dream items

this weekend, for my sins - i will be finishing stripping the dining room and repainting the walls and the ceiling. then i need to paint the fireplace, paint all the mahogany-esque furniture and re-fabric the cushions. after that i will be hanging the lovely chandelier my mum bought us for our wedding (long overdue as it was in 2009 but I didn't want to hang it till i have decorated - you don't put your earrings on before your LBD do you?!) then and only then can i concentrate on my dream wall feature. sadly all or most of these gorgeous items above will be sold on Etsy, but at least it will give me some inspiration to focus on during the decorating process.

 PHOTO FROM house to home

some ideas for creating a feature wall -
  • you can use objects as well as framed pictures
  • why not create a feature with some of your favourite paper ephemera,photos,postcards etc.. by pegging them to some string with miniature pegs
  • mismatched antique mirrors
  • create a 3D wall display collage of anything that takes your fancy from car boots, charity shops etc.
  • hang an embroidered rug, blanket or tapestry
  • empty frames look amazing as a feature display. also try hanging them with jewellery and other beautiful items pinned inside
  • other items you can pick up for your feature wall is sheet music covers, record label covers, old posters and maps
  • why not cover a whole wall with vintage pages from old encyclopedias and books


some tips for creating your display -
  • you do not have to use frames for your pictures - sometimes finding frames causes a delay in creating your wall, but why not just go without - it will still look just as good
  • if you are using frames, please do not overlook old / vintage frames. you can repaint them to suit you and often the oldest most shabbiest look the best. also you will often find old frames with their original contents such as vintage photos and paintings
  • the collage does not have to conform to any type of shape - unless the items are part of a set or all have the same theme then, they do tend to look better in a more structured display
  • you can try a small area first such as a cloakroom wall or above your bathroom sink
  •  be brave - if you like it then that's fine - it is your home after all!
  • if you are still not sure you can create a collage within a large shadow box or old drawers and hang that up, if you don't like it then it's only one item to take down

PHOTO FROM lonadeanna.blogspot.com 

TOP IMAGE COLLAGE CREDITS -top left drkennedyjones 
                                            top right maisonpaulette
                                            bottom left malcolmstudioshop
                                            bottom middle cabinetoftreasures
                                            bottom right theperfektionist

Wednesday, 16 February 2011

decorating on a budget - anthropologie look for less


everybody loves Anthropologie don't they? but not everybody has their budget (i certainly do not). however all is not lost. i have found a really great website called fine craft guild and they have some fab tutorials for you to follow to 'anthro up your house' for less! i am hooked - i can't wait to try out the lettered drawers tutorial and it's even given me some ideas for my dining room - finally i am getting somewhere. did you see the fabric on the chair in the top picture? i am in love. take a look at the fine craft guilds article here

above pics all from Anthropologie