Tuesday 29 March 2011

dining room makeover progress

 hi guys, as promised a little update on the dining room makeover since my last post. with the help of my sister (thanks again Kelly!) the walls are done and the dresser table top and fireplace surround. i chose farrow and ball's james white in eggshell for these. i know that farrow and ball paint is not normally the 'budget choice for paint' (i know what you are thinking 'this is a budget decorating blog?') but the reason i chose it was because it was only for the furniture and it does go a very long way. also it hardly drips and created a really professional finish. i only needed two coats and each coat dried in about 5 minutes which helped speed up the whole process. it cost £17 per small can (a litre per can - i think) so £34 in total and for the massively improved look of the dated early 90's furniture - it was money really well spent.

to paint the dresser we took off the hardware - ie. brass knobs and door hinges and took out all of the door glass and the glass shelving. in hindsight i wish i had left the doors on to paint them as they were very fiddly to paint while on the floor as i had to wait for each surface to dry before proceeding to the next part. i had to paint all on the inside of the top section of the dresser as it is all exposed due to the mirrors, lighting and see through doors and had to be careful with the paint. this was probably the fiddliest part of all. for the bottom all i did was paint the inside of the doors. i didn't bother painting the shelving inside as it won't be visible and i had to be sparing with the paint!
once dried i used some varnish/paint remover from b&q on a piece of cotton wool to remove the excess paint on the mirrors at the back.
then i replaced the knobs and shelves and attached the doors. our friends were so surprised when they saw the dresser - they couldn't believe that my Mum (who gave me all the dining room furniture) got it along with the matching extendable table and chairs at a charity furniture shop all for about £100!

you may be wondering why i didn't paint the chairs too. well, we did paint two chairs but my husband felt that it would maybe be a bit too much white so we opted for the contrasting look and kept four of the chairs in their original mahogany-esque style and the other two painted chairs can be for extras as and when required. also i decided not to paint the table legs for two reason, again for the contrast and also as i was running low on paint!

 there is still a lot to do but i decided to add just a couple of decorative features as we had friends to visit on the saturday following all of the painting so wanted it to look at least a little bit presentable. so i put my vintage sewing machine back in her corner and plonked the candelabra on her and thought it looked quite good so kept it there. then i just added a couple of spritzer bottles and a vintage shoe form (all found or given to me from charity shops/car boot) on the mantelpiece along with some glass tea light holders and a cute picture of my stepson.  

so, now for the next 'to do' list

  • remove the awful blue carpet
  • paint the skirting boards
  • fit the new carpet (i have sourced a natural coir carpet at around £12 a sq meter)
  • recover the upholstery on the dining room chairs
  • find or make some nice cushions for the chairs
  • get a nice rustic mirror for above the mantelpiece and lots of frames and pictures for the walls (this will definitely be a work in progress task)
  • fit the chandelier
  • work out what to do about disguising the clashing marble surround and gas fire - maybe i'll find a large fire screen to cover it - any ideas on this dilemma are greatly appreciated!
  • fit some nice curtains - colours not yet decided - again any ideas are most welcome
i think it will be another few months till its completed but i feel like i am getting there now. the next stage is to add some warmth and colour to the room by way of the carpet, fabrics and pictures. mainly the pictures as i can change those as and when the mood suits me. and the cushions i will be adding to the chairs (on top of the new upholstery) will be easy to change too, which is good as i am thinking of hot pinks, oranges and purples for my first set of cushions!

R x

Monday 28 March 2011

nice thing to look at - summertime vogue posters

 1937
 1935
 1941
 1932
1947

hello all! hope you have had a lovely weekend. i am so glad that the offical 'british summer time' is here. it didn't start getting dark till about 8pm last night which was so lovely and even though it isn't quite summer temperatures yet, it is so good just to have more day light after a very long cold winter.

i don't know what the weather is like where you are but i thought i would share some vintage voque summery covers for you to cheer you up anyway. can you believe that some of these covers are over 70 years old?

IMAGES VIA (FROM TOP TO BOTTOM)


Monday 21 March 2011

hanging vases

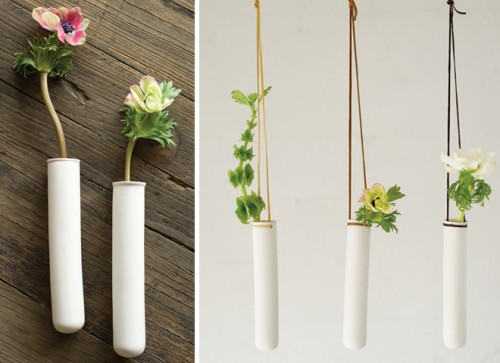
i saw these unique hanging vases found on analogue life  via hello, friend and thought they were so clever. i don't think i have seen flowers displayed in this way before. it's a great idea for me as i don't seem to have much display space ie. shelves but have loads of bare walls. this would be a really easy and clever way to brighten them up - and make everything feel even more spring like! here are some more ideas -

                                                                                                         PICTURE VIA GOINGHOMETOROOST

single hanging bottles look great as vases, simply tie with twine or string and hang from a secure nail. i love the simpleness of this style with the one single bloom

                                                                                                                    PICTURE VIA I ADORE STYLE

these test tube style vases are really cool and you can buy vases like these here and vintage test tubes look awesome too for displaying your flowers check out these.


                                                                                                 ABOVE PICTURES VIA GARDEN MAMA

for a super sweet hanging vase tutorial please check out this gardenmamas one here. and click here for a fab tutorial for creating a beautiful wedding themed hanging vase centrepiece from ruffled blog.

hope you have a lovely monday!

R x

Wednesday 16 March 2011

Bloggers Day of Silence for Japan

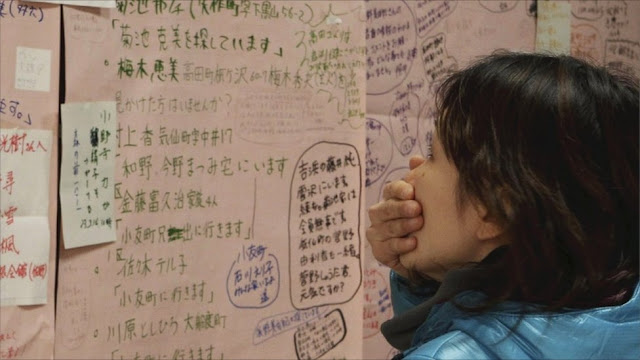
 i will be taking part in the Bloggers Day of Silence on Friday the 18th March for all of those people so sadly affected in the Japan disaster.this means that there will be no post on Friday in respect for all of those who have lost their lives, family members,friends,pets and homes.  


this day of silence has been organised by the girls from Utterly Engaged and all of the details for how to get involved are here. the girls have arranged a fundraiser for Shelterbox a charity that provides boxes for families affected by natural disasters and they include the following items -

  • a tent for a family of up to ten people
  • a children's pack containing pens, colouring books and other small but much treasured, gifts
  • thermal blankets and insulation sheets
  • a water purification system
  • a basic tool kit that will enable people to improve the current surroundings and chop firewood etc..
  • a multi fuel stove, pans utensils bowls and mugs
  • the box itself is multi purpose and can even serve as a cot for a baby

your donation can help towards the cost of one of these essential life saving and hope giving boxes for a family suffering in Japan.  

if you would like to donate you can here - all donations will make a big difference, large or small - every little helps.
and if you are in the UK like me, you can donate straight to Shelterbox here
if you would like to join in with the Bloggers Day of Silence and help spread the word about Shelterbox please take a look here -

Thank you for reading, and thanks in advance if you able to take part in any way at all.
R x

ABOVE PHOTOGRAPHS - BBC NEWS

Monday 14 March 2011

nice thing to look at - and a thank you

hope you all had a lovely weekend - i saw this print by amber alexander on etsy and thought i would share it with you. also i wanted to say a big thank you to you all for reading this blog. i hope you are enjoying my posts and it's so encouraging every time i see a new subscriber or follower. it would be lovely to know if there are any types of posts you would like to see more (or less!) of.

this week i will post some more pics of the dining room make over - it is getting there but has been quite stressful but more of that later! have a lovely Monday
Rx

ABOVE PHOTO - AMBER ALEXANDER

Friday 11 March 2011

inspiring etsy shop - Mr Finch

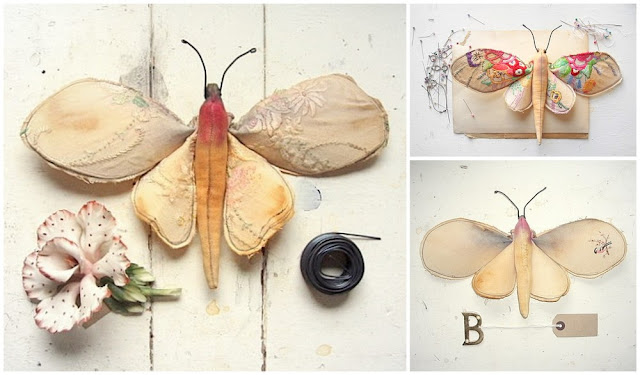
i came across the beautiful handmade fabric moths while browsing on flickr looking for inspiration for my feature wall in the dining room. i thought one of these would be perfect to include. they are all hand crafted in Leeds UK by Mr Finch - an incredibly talented artist. he uses vintage fabrics such as table cloths and napkins, along with beads and wire to make these striking works of art. i am definitely going to be buying one of these moths in the near future and also i absolutely adore this miniature dress (bottom right below) it would look stunning in a shadow box wouldn't it?.
in fact - i want everything in his etsy shop. even the sold items such as this gorgeous handmade hare (above left) called Cherrypin The Moon Gazing Hare - soo adorable and made from fake fur which is a thumbs up from me. i also think this small trophy style head of a weeping fox is so clever and would make a real statement piece and talking point.


please go and take a look at his shop here. the prices are amazing too - considering how much work clearly goes into these lovely objects. also, please check out the my name is finch blog where you can follow his processes and see all the lovely new things he is making. 

ALL ABOVE IMAGES COURTESY OF MR FINCH

Sunday 6 March 2011

dining room make over


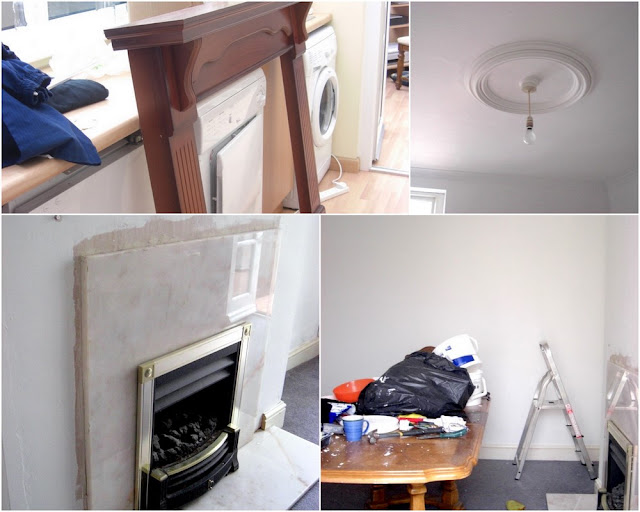
i thought i would post some pics of my dining room make-over progress so i can have a record of how bad the in-between stages are and then (hopefully) when it is finished some pics of how good it can look afterwards. this is so that i don't get totally depressed next time i have to decorate a room (which will be many times as the whole house needs redecorating!)

to be honest even though i am now on the 2nd day of painting and the 4th day of decorating in total i am starting to feel like i am getting somewhere. the first two days were spent stripping the wallpaper which had been painted over a couple of times so, wasn't particularly easy to remove. i am very grateful for the help my sister has given me with this too. i would still probably be stripping still if i didn't get her to help!

anyway, here is what i have left to do -

  1. some touch ups of paint on the walls
  2. get the carpet up
  3. clean and gloss the skirting boards
  4. paint the fireplace surround and re-attach
  5. undo and paint chairs
  6. re-upholster chairs
  7. paint table
  8. paint dresser
  9. re-carpet
  10. fit chandelier
  11. put up pictures and mirrors etc....
no.11 is the bit i can't wait for oh, and no.10 too. i feel better now i have written a list! i hope to have it all done by next weekend but - we'll see :)

R x

(by the way the table in the pic is being repainted - i would never normally treat a lovely piece of furniture so cruelly!)

Friday 4 March 2011

free library card template


/ / UPDATE / /
Please visit this blog post here for some new downloadable library card templates - the download link on this page is no longer working 
/ / / / / / /

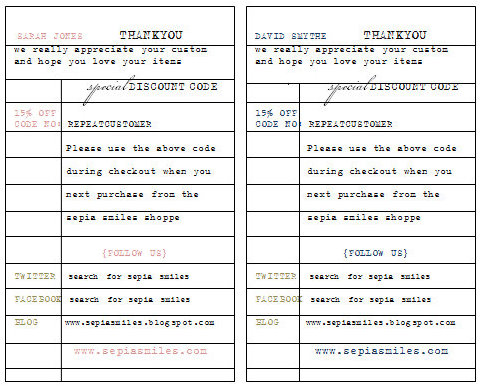
i have a freebie for you this wonderful friday. a library card template.

i created this template for myself originally  as a card to send to my customers along with their purchases. 
it can be confusing deciding what to send to customers in the mail, some people don't really like freebies as such as the are sometimes things they don't particularly want so unfortunately tend to end up in the bin. and some people do not like the idea of more paper being used pointlessly. well, this template is for printing off thank you cards that have triple uses - 
  • as discount code vouchers (ideal for Etsy sellers)
  • and as a form of advertising as there are areas to add you blog, facebook etc.
  • and as a personalized thank you card (all customers respond well to a personal thank you)
these cards can also be modified for creating -
  • greetings cards
  • book club library cards
  • invitations
  • love notes
  • rsvps
  • place settings
and more..

TO DOWNLOAD THE LIBRARY CARD TEMPLATE CLICK HERE

simply download and edit as you please. please also check the margins are set to 'normal' in word. you can print onto any type of thick paper or card - i prefer extra thick card as it has a more authentic old fashioned 'letterpress' feel that way.

don't worry if you do not like the text choices i have made, you can edit the template however you wish. this is just a general layout for you to do as you please.

if you do like the fonts i used, they are -
  • typical writer available for free here
  • champignion available for free here
personally, my favourite font website is fontspace purely because the fonts are easy to search for and i love the layout. if you use this website they have a guide on how to download fonts -something i had no clue about before and i always used to wonder where everyone got their wonderful fonts from! here is their help page with all the info.

hope you have a wonderful weekend!
Rx