Tuesday, 26 April 2011

book lovers dream


hope you all had a lovely weekend!
I have been looking for inspiration for bookshelves and found these huge ones on pinterest and had to share them with you. i think they are amazing - i would love ceilings high enough to actually need a ladder to get to the books.

don't forget the giveaway is still open to enter until Friday - go take a look here for the details.

Friday, 22 April 2011

shop update + giveaway

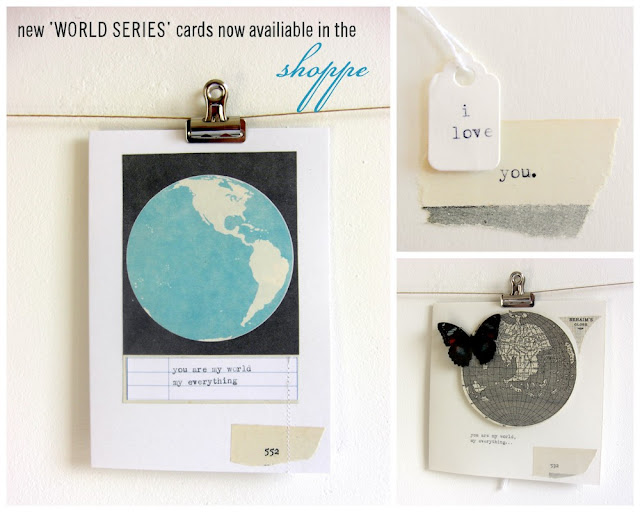
a new range of love cards named 'world series' have been added to the shoppe to include library style cards with pull out library cards made from vintage pages based on our customer favourites. and some more of my personal favourite vintage globe cards. take a look here.
another customer favourite back in the shoppe are the 'scrapbooks in a matchbox'. this time they have a much more authentic feel as they now have vintage typewriter quotes added along with various vintage paper ephemera. these 'world series' travel inspired scrapbooks are the perfect alternative to the traditional greetings card. you can customise them yourself with tiny photos and personal messages or let your recipient add their own. you can view these here.


another new item added to the shoppe are these larger sized paper packs. the paper ranges from the 1920's to the 1970's and features anatomical diagrams, sepia toned book pages, geographical pages and colourful children's book pages. ideal for 
scrap-bookers,crafters and anyone who loves old books and paper.
you can view them here. also we have smaller paper packs available too here.

{ GIVE-AWAY }

i am giving away one of each of these new items -


{ COMMENT TO WIN }

simply visit the shoppe and leave a comment back here
on your favorite item from the shop.


( +1 EXTRA ENTRY )

Twitter or Facebook about this give-away. come back and comment with the link!


( +1 MORE EXTRA ENTRY )

come back here and leave a comment letting me know which site you follow for an extra entry!


this contest is open to anyone around the globe and ends on Friday 29th April at 12pm GMT. the winner can choose one of each of the stated items from those availiable in the shop at the time of winning. please check back after the 29th April to find out if you are the winner!


{SPECIAL DISCOUNT CODE} if you enter the contest by following the details above you will automatically be legible for 15% off your next purchase in the shoppe - simply enter WORLDSERIES during checkout to redeem your discount voucher.

Good luck guys and have a lovely Easter weekend!

Rx

while creating these items with the world theme, i didn't realise that it is actually Earth Day tomorrow. Earth Day was introduced to inspire awareness and appreciation for the Earth's natural environment and the first ever Earth day was way back in 1970! to find out more about Earth Day click here.

Tuesday, 19 April 2011

weekend project

i made this framed collage at the weekend as a bit of a project. it didn't take long at all to create and it was super cheap too. i used one of the old frames and a couple of the stamp collecting envelopes from my february car boot visit.

to create the layout all i did was cut out a piece of cream card to fit the frame backing and then laid a strip of a vintage page about 3/5ths across and then placed a small paper doily on top of that - offset to the left and in the centre of the layout. i then had a look in my paper bits and bobs basket and found a piece of card with a page number glued onto it - i stuck that on the bottom right hand corner and then affixed the envelopes onto the top of all of that. it took about 5mins (well, a little longer as i had to clean the old glass in the frame). all in all it cost about £2.50 - not bad eh?

R x

Monday, 18 April 2011

inspiration boards

hello, you guys - hope you had an excellent weekend!
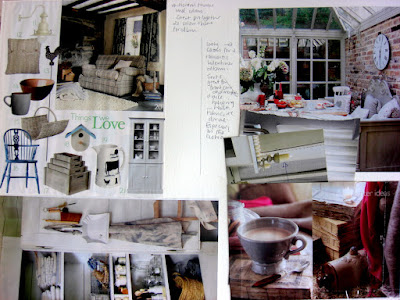
while tidying my cupboard 'studio' i came across these old inspiration boards i had created about 3 or so years ago and it got me all 'inspired again' my taste is still pretty much the same except that i am more open to modern pieces of furniture too. all of these images were cut from country homes and interiors magazines - one of my favorite interior mags along with Elle decoration. the above image is my favorite look of all, i love the colours and the little cupboards on the walls - i would have these everywhere in my house - especially in my bathroom.

 this image was what first inspired me to put some kind of dresser or shelving area in the kitchen - still not got around to it yet...
 i love shiny metal suitcases on top of this dresser - i would so love some of these on top of mine in the dining room
 some 'cosyfying' home accents
 i love the use of old suitcases again in these images
 i adore this old antique mirror - i think this was a home in Switzerland or Austria - i also like the clever use of space for the book shelves
 a beautiful workspace - i love the vintage furniture with the  modern chair - and the mustard wall colour is perfect

 i love this tealight chandelier - i want to get one for the dining room and hang it above the french doors
i like this pin fabric pinboard - the ideal addition for any room, great for putting important pieces of paper and business cards etc.. or simply for decoration with old postcards and sepia photos. * here is a diy tutorial that i found for making a fabric pinboard - hope you are having a great Monday :)

R x

p.s thank you to all of those of you who have recently commented on my blog posts - i really appreciate it x

Tuesday, 12 April 2011

colour burst - yellow


TURQUOISE AND YELLOW VIA DECOR8 

 i don't know about you but i do love a burst of colour every now and then. i think this is why i am going to stick to white walls as i can add some colour as and when my mood changes. at the moment i am quite loving yellow after viewing these gorgeous images via pinterest - have you checked it out yet? it's full of amazing images and inspiration. here's some more yellow -


 BEAUTIFUL WATERCOLOUR BIRD - AMBER ALEXANDER
 YELLOW BITS AND BOBS - DECOR8

 YELLOW CURTAINS - STYLE AT HOME

 YELLOW FLOWERS AND ORANGE LETTERS - DECOR8

 STUNNING MUSTARD YELLOW SOFA- DIY IDEAS

YELLOW WALL ART AND CUSHIONS - ORIGINAL SOURCE UNKNOWN

SIMPLE YELLOW GARDEN FLOWERS - HEMOCHLYCKA

if you know the source for the wall art photo - please let me know so that i can credit them - thanks so much :)


* thanks to Celessa for helping me find out who created the bird watercolour - take a look at Celessa's beautifully vibrant blog here

R x

Friday, 8 April 2011

rustic garden furniture ideas

i have been looking for some garden decorating ideas and came across some lovely images to give me some ideas too. can you believe i do not actually have any garden furniture? i mean, who hasn't got at least a table and chairs! my husband is from South Africa so he is constantly 'braai-ing' (the Afrikaans word for barbequeing)come rain or shine!which makes me even more ashamed that i havn't sorted out my garden furniture situation.
The thing that has held me back is that they are so expensive to buy new if you like the rustic/vintage/shabby chic look like me. i seriously need to go hunting for some cheap but stylish finds. i love the idea of some folding bistro style chairs (they can be packed away to keep dry when it rains) 
i would also like some lanterns in varying sizes - there's nothing quite like talking with your chums outside over candlelight (and some wine) on a late summers evening is there?
here are some ideas..
distressed painted furniture with pretty throws
rustic vintage benches piled with cushions
farmhouse style dining chairs and table

        IMAGE VIA PINKLE MONA DESIGN           IMAGE VIA CANDY HEARTS AND PAPERFLOWERS
           chest of drawers                     armchairs
here are some different and cheap garden furniture ideas -

  1. paint your current furniture a different colour. who says that all garden furniture must be brown?
  2. use dining furniture in the garden. if it is extra special you will need to keep it stored away when the weather is bad to stop it distressing - unless like me, you like that look of course.
  3. take your fancy chairs out into the garden for special occasions
  4. you can even incorporate chests of drawers and dressers into the garden - especially if you have a large patio area. or pergoda. you could paint them with outside/exterior paints to protect the woodwork
  5. bistro sets look stunning in different shades of paint - especially bottle green,dark red and yellow - even better if the paint is peeling off a bit!
  6. hammocks - who wouldn't love a hammock! i just don't have two trees to hang one from :(
  7. mismatched chairs are ideal for the vintage/rustic look garden AND for the bank balance as you can pick up old chairs for next to nothing (£5 or less) at your local car boot sale. anyway, mismatched chairs look better too.
  8.  vintage metal beds make unique outdoors day beds- see below                                                 IMAGE - LUNDAGARD VIA PINTEREST
add ambience to summer entertaining with these accessories-


  1. lighting - an absolute must for summer evening entertaining. you can create lighting with tealights in simple holders or jars. more elaborate tea light holders are also availiable that fix to outside walls. lanterns in differing shapes and sizes aswell as hurricane lamps help add ambience. fire pits are a great focal point. also, why not bring your fancy candelabras outside to the garden, these look excellent on a vintage style table - the more the better too. simple church candles also work really well clustered together.
  2. lots of plump cushions. i like either neutral such as natural fabrics and cream, white and brown tones. or blue and white stripe or grey tones. cushions look so chic piled onto a bench. throws in different colours and patterns are a great way to keep warm helping to extend the party into the night!
  3. vintage tea cups and cake stands
  4. mismatched cutlery
  5. vintage bottles such as pharmacy/apothecary bottles/lab/medicine bottles used like vases with single flower stems inside. wine bottles as candle holders. vintage milk bottles and soda bottles for storing your drinks.
  6. bunting. you can make your own bunting from fabric, postcards,vintage photos and even garden seed packets.
  7. flowers - either single stems in individual bottles or small vases or large displays in eleborate vases - either way - it has to be done! flowers also look beautiful in vintage enamel jugs and mugs.
  8. if you haven't got the table of your dreams or, it isn't the colour you would like you can always dress it with a tablecloth. i am actually considering doing this with our old dining table that is living in our outbuilding. i have seen some lovely vintage linen fabric on etsy that i could make into a table cloth.
  9. if you have any  bare exterior garden walls - why not paint them in the colour of your choice and decorate with hanging baskets or garden art.


                      IMAGE VIA COUNTRY LIVING

click here for an excellent guide from country living to organizing a summer garden party.

i hope this has given you a few ideas to enjoy your garden and maybe throw a party on two this summer - if you have any more tips for garden parties or cheap furniture ideas please share them!

R x

Tuesday, 5 April 2011

paper bag packaging tutorial

 hello guys, i would like to share a really simple paper bag packaging tutorial with you today. i came up with the idea for the packaging as a simple way to create lovely packaging for my scrapbook matchboxes that i am listing soon in the shop.

i have always loved the effect of stitches against paper and have seen other people create lovely paper packaging before but i never could do anything like this as i didn't have a sewing machine. well, luckily my mum has lent me her sewing machine so now i can sew away to my hearts content.

so, clearly this tutorial is intended for those of you with a sewing machine. you could of course stitch by hand if you would like (i have never attempted to do this as i am a rubbish at hand sewing but i am sure it is possible)

#quick tip - it's always helpful to read through the tutorial once before you begin. 

so, above are the required items apart from a sewing machine / needle and thread which you will definitely need.

1. brown (or white paper bags) mine measured approx 18 x 18cms (7 x 7 inches)
2. paper doilies (you can find them in the cake making area in any larger supermarket)
3. scissors
4/5 various scraps of paper. some must be pale and plain so that your text will show clearly 
6. nylon brown cord for decoration

also you will need some type of functional rolling stamp (which are available on here on etsy, and at larger craft stores) for creating your label text or you could print yours out first on the computer. also, i have used my typewriter for one of the styles of bags but if you don't have one that is no problem either. you could even just hand write the labels for that extra personal touch.

so firstly you need to fold your bag into half and then sew along the edges where the sides meet but make sure not to sew along the original bag opening (1 + 2) then, take a paper doily and fold one edge over to about a third across and cut the folded over section out (3) then take two piece of your paper selection making sure that one is a pale/neutral piece so that your text will clearly show (4). # please note if you are using a computer or typewriter you need to type and print your text onto the paler piece of paper first before proceeding to cut it .then cut the paper pieces into two lengths of around 6 cms long and 1 cms wide (2.5 x 0.4 inches) then cut the paler coloured strip a little bit thinner so that you can see the other strip underneath when you lay it on top. cut a triangle shape out of the wider strip at one end.
 once you have your two strips created you need to stamp (1) your text along your pale strip.(if you have not printed or typewritten it of course!)i used the text 'for you' and 'happy birthday' for my bags. after this you need to roll over the open end of the bag a couple of times and then place your folded piece of doily over the folded edge. take your two paper strips (2) with the text strip on top of the other strip and so that the cut out triangle area is showing past the top strip. fold these over the the doily where the doily is folded also. i try to position the paper strips slightly off centre for a better effect. then sew all along the edge of the bag about 1cm (0.4 inches) from the edge. finally cut of the overhanging edges (3) of the doily so that it is nice and neat. you can use any words you like for your bag (4) you can use these bags for birthday gift wrap, etsy packages, handmade confetti, favours - the list goes on..also, i used the nylon cord to wrap around the bag a couple of times and then tied it simply for that little extra touch (not shown in the photos).
above are two of the bags i made. the one to the left is one that i hand stamped with the functional rolling stamp and the one on the right i typed on my typewriter. i think the one on the left is ideal for both male and female recipients as it is not quite as fussy as the one on the right - but i prefer the doily effect - don't you ;)

Friday, 1 April 2011

sepia smiles newsletter

hello everyone and a big welcome to all of the new subscribers to the sepia smiles newsletter - i hope you like it!

i have decided to give the website a little spring clean and jolly it up a little bit - here is a snap shot and you can also view it here. as you can see, i have added a new link for the tutorials and diy page here, on the blog and i will be adding some more tutorials that i have recently been working on very soon.

along with the etsy shop, we now have a big cartel shop. this is so that UK buyers can also shop with us in pounds and our overseas buyers can continue to shop in dollars in the etsy shop. the main website links straight to the big cartel shop (from the right hand side bar) but if you would like to continue shopping from the etsy store simply click on the American flag in the top right corner of the website and it will take you straight there.* please note that all buyers from UK and overseas can shop from BOTH shops.


on a different note, an exiting piece of news is that i have been featured in the april edition of r magazine a contemporary publication for northamptonshire and surrounding counties. you can view the article here (on page 65) 

in the studio i been working on some revamped versions of an old customer favourite - the 'scrapbook in a matchbox'. these little tiny scrapbooks within a matchbox were the first things i ever sold in the etsy shop and now they are back - well nearly, i will be adding them to the shop over the next few weeks so will keep you  updated on those when they are availiable to buy.lastly, just a reminder that all blog followers, twitter followers and facebook fans are legible for a 15% reduction on all sepia smiles items. simply input code FOLLOWER during checkout at both the etsy shop and the big cartel shop


have a lovely weekend

R x